
Speeder Bike Chronicles: The Build Awakens
- Virgil

- Apr 21
- 6 min read
The 74-Z Speeder Bike Build - A Long Overdue Update
When I wrapped up the first article on this build back in August, I left you with a promise. The next post was going to be all about first print reality-checks — what the files actually deliver when they come off the machine, and what needs to happen before anything resembling a finished model starts to take shape. I even had a tidy little “Up Next” section to set the expectation.
That was eight months ago.
Life, as it tends to do, had opinions about my timeline. Work pulled hard in one direction, and my condition pulled in another. There were stretches where the studio felt less like a creative space and more like a room I was walking past. Anyone who builds — or who manages a chronic condition alongside a hobby they love — will know exactly what that feels like.
To be clear — the build didn’t stop entirely. The posting did. On January 13th I completed the Scout Trooper, which was the most straightforward part of the build and, frankly, exactly what I needed it to be. A contained, finishable thing that gave me a small but genuine sense of accomplishment at a point when those were in short supply. I just never wrote about it.
This past weekend, I turned attention back to the bike itself.
So. The Print Reality-Check. (Fashionably Late Edition.)
I promised you this article, and here it is — just not quite when I said it would be. Consider the delay part of the authenticity of the thing.
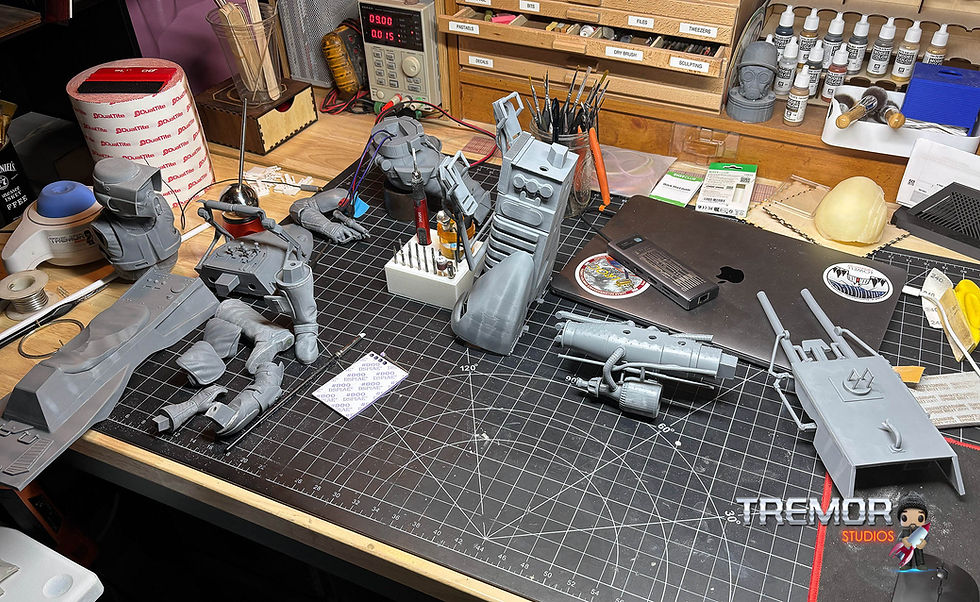
When the files for the 74-Z first came off my Anycubic machines, there was that familiar mix of excitement and pragmatism that every 3D printing hobbyist knows well. The forms are there. The shapes read correctly. At a glance, in the right light, it looks like the thing it’s supposed to be. But a glance isn’t good enough at 1/5th scale.
The closer you look — and at this size, you have to look close — the more the gap between what the file promises and what the print delivers becomes apparent. Here’s an honest account of what I found:
Layer lines. Unavoidable at this stage of the technology, and on a model with as many curved and organic surfaces as the speeder bike, they demand attention. Sanding is not optional. It is a significant part of the process and on a build this size, a significant investment of time.
Detail errors. Some elements of the files simply weren’t accurate enough to survive scrutiny at this scale. The turbine fans of the engine lacked the crispness the part demands. The forks and front fins came out warped and under-detailed. The control shifter and panel were disappointingly soft in detail — and featured Phillips head screw heads, which I’ll just leave a moment to breathe: Phillips head screws. In the Star Wars universe. We’ll not be keeping those. The thrust exhaust diverters (my working name for them) were similarly lacking, and the footrests, pedals and surrounding framework simply didn’t print well enough to salvage without significant intervention.
Print artifacts. Stringing, layer shifts, and surface imperfections in specific areas that needed cleaning up before any detail work could begin. Nothing catastrophic, but nothing you can ignore either.
Structural considerations. At 1/5th scale, certain printed parts that might be adequate at smaller sizes become a liability. Thin sections, small connectors, and fine detail elements are candidates for replacement with brass stock — more on that below.
The Plan of Attack
Rather than just cleaning up what came off the printer and calling it done, I made the decision early on to treat this as a restoration and improvement project as much as a build. The files gave me the bones. The job is to give it the fidelity this scale deserves.
Here’s where things currently stand and what’s being done:
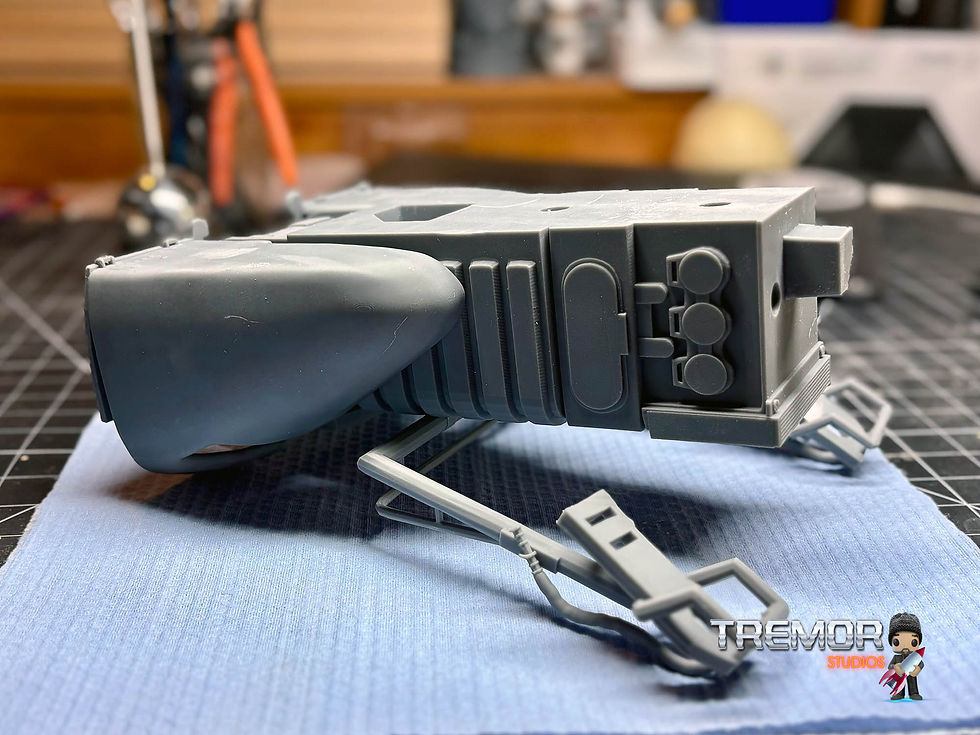
Engine prep. The 3D printed hoses and pipes have been removed entirely. The original fan blade was routed out, a suitable replacement was designed, printed, and fitted to the engine cowling opening. The bones of the engine are solid. What’s current is the detail work — specifically, working out the hosing and pipe runs. I’ve sourced small scale braided line and wire, and will be using small threaded knurled insert nuts as improvised billet fittings to route everything convincingly. It’s the kind of detail that won’t be obvious at a glance but will absolutely read when you look closer.


Footrests and pedal assembly. The printed footrests and pedals are gone. The framing and pedals have been fully redesigned and reconstructed from brass tube stock — a significant improvement in both accuracy and structural integrity.
Handlebar and control assembly. The 3D printed handlebars and center control shifter section have been ground off completely. This area is being redesigned from scratch, with provisions for subtle LED lighting on the control panels. It is also, currently, the section giving me the most pause — more on that below.


Surface work. The sanding continues throughout. Layer lines are being addressed section by section, and support material removal alone was a considerable undertaking. The price you pay for complex geometry at this scale.
The Scout Trooper. He’s done. Finished on January 13th, barring final weathering details. He’s sitting on the bench watching the progress, blaster slightly raised — patient, but clearly keeping an eye on things. He’ll get his own dedicated post when the time is right. He’s earned it.

Current Studio Reality
In the original article I mentioned that the 74-Z wasn’t the only build competing for bench space. Boba Fett’s Slave One and an Imperial Probe Droid were both fully printed and scattered around the workspace while I worked through some technical approaches I had planned for each. Both are still there. Both are still waiting.
In August I wrote: “Yet here I am, about to add another Imperial vehicle to the mix. Sometimes the heart wants what it wants.”
Eight months on, the Slave One is still in pieces, the Probe Droid hasn’t moved, and I’m elbow-deep in a speeder bike that I’ve essentially decided to rebuild from the handlebars down. I stand by the sentiment entirely.
An Honest Aside
Something worth saying clearly: none of the above steps are strictly necessary.
This kit, printed as designed with the usual amount of cleanup and sanding, would build into a very respectable model. The files are solid. A builder with less obsessive tendencies than mine could have this thing on a display stand in a fraction of the time I’ve spent on it.
Everything I’m doing — the brass replacements, the LED work, the part redesigns — is personal preference. My choice to go further than the kit asks. And if I’m being fully honest with myself, that tendency to scratch-build where I could simply finish is probably another reason you’re reading a comeback post instead of a completion post. My quest for perfection has a well-documented history of becoming my inability to move forward.
I’m aware of the irony. I’m choosing to lean into it anyway.
Where Things Stand Right Now
This past weekend was spent primarily on two areas — the engine detail and the handlebar assembly.
On the engine side, things are moving in a direction I’m happy with. The braided line, wire, and knurled insert nuts are coming together as a solution for the hose and pipe runs, and seeing that approach start to take shape is the kind of small confirmation that makes the hours worthwhile.


The handlebar situation is a different story. With the original printed assembly ground off entirely, I’m now staring at an open problem — how to construct new handlebars, grips, and attachment points that look right, are structurally sound, and can accommodate the LED work. What I have at the moment doesn’t satisfy me. I’m not going to force a solution that I’ll regret later. This one needs more thought, and I’m giving it that.
Knowing when to stop and think rather than push forward badly is, I’ve learned, its own kind of progress. The model as a whole is alive again. That matters more than I can easily explain.
Moving Forward (For Real This Time)
I’m not going to give you a completion date. August taught me better than that.
What I will say is that the build is active, the bench is warm, and the posts will follow the work rather than the other way around.
Up next — and I mean this with appropriate humility given my track record — will be a proper look at the Scout Trooper.
I should also be upfront: two significant work travel assignments are coming up across May, June, and July. The studio will be quiet during those stretches. I’d rather tell you that now than have you wondering in three months why things have gone silent again.
The build will be here when I get back. So will I. The 74-Z is a long way from done. But it’s moving again. Thanks for sticking around.
TremorStudios — precision work, on its own timeline.

Comments