
Bringing The Next Generation to Life with 3D Printed Busts
- Virgil

- Jun 14, 2025
- 3 min read
As a lifelong Trekkie, I've always admired the iconic characters from Star Trek: The Next Generation. Their bold adventures and thought-provoking stories captured my imagination from an early age. Over the past few months I’ve been working to pay tribute to these beloved characters by 3D printing and painting a series of detailed busts.

Modeling the Busts
As my 3D sculpting skills are limited to dabbling in TinkerCad, the first step was finding accurate 3D models of the main cast members. After some research, I found, Antonio Data Menchero, a talented artist who has created models of Captain Picard, Data, Worf and Geordi La Forge, Will Riker and Deanna Troi.
Antonio offers these sculpts on CG Trader, along with busts of other Star Trek franchise favorites, you could go 3D printing wild. With the files downloaded, I was ready for 3D printing.
The files come as fully assembled or in two sections; the head and torso, which I appreciate as separate parts will make painting and scaling-up (or down) much easier. He does offer a Dr. Crusher, but that file is only available as a complete bust.
Printing (Replicator)
I think we’re a ways off from being able to tell the computer to replicate a tool or ask for Capt. Picard’s favorite drink, Earl Grey-hot, but 3D printing is still quite fascinating.
Before 3D printing, the files have to be configured and sliced, and depending on what type of 3D printing medium you’re using, the process will vary.
For this, and all of my 3D prints, I’ll be using resin. It’s a bit labor-intensive during post-printing, however the details are well worth the added work.
I have been using Chitubox for resin print file setup and slicing ever since I got into 3D printing. There are a few software options available for resin printing and those that will favor one software over another. Almost as insistently as one might choose Mac over PC … or vise-versa.
I have two AnyCubic machines in the studio. One AnyCubic Photon Mono X and a AnyCubic Photon M3 Max. I use Phrozen 4K/8K gray resins for all of my prints and while there’s also a wide range of debate over what resin is best, this brand works best for me. I carefully printed each bust at a 0.20mm layer height to capture all the finite details. The printing process took around 4-5 hours per bust torso and head, and while I have the M3 Max on hand, I decided to run these prints on the Mono X.
The Mono X is a real work horse and it’s dialed in to where I rarely have a printing failure.
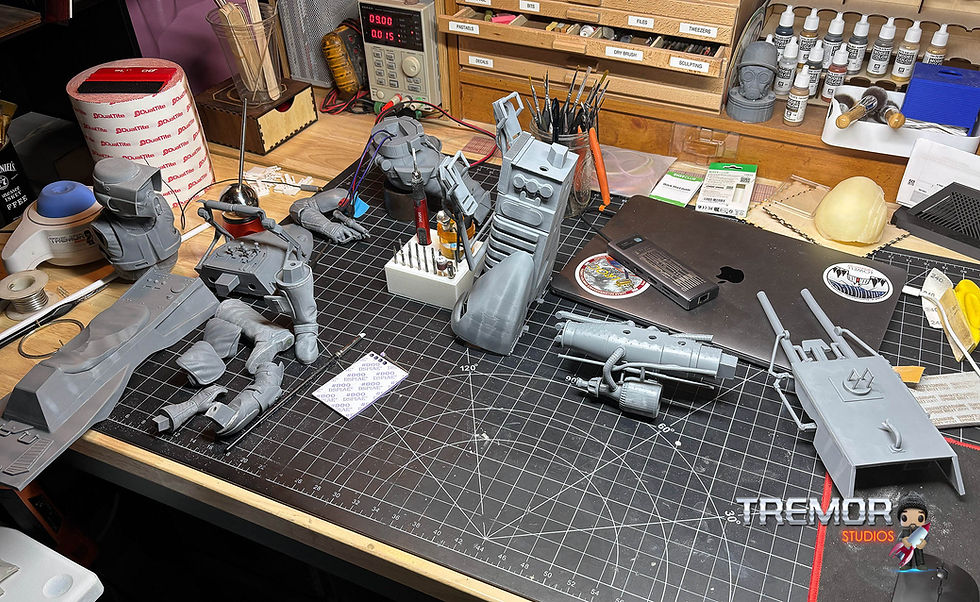
Post-Print Prep
Once printed, I carefully removed any support structures and sanded down faces and textures to prepare for painting. Using brushes and compressed air, I thoroughly cleaned out each crevice to ensure a smooth painting surface.
I typically prime my figures with black Stynylrez using my airbrush, which dries quickly and provides an amazing “shell” of protection. The second coat is with a flat white and sprayed from the top down, catching the high spots of the figure which simulates lighting.


Painting
This was the most intricate and rewarding phase. I studied numerous reference images to accurately match skin tones, makeup, hair colors and uniform details. All of the models were sculpted with the comm badge and rank insignia pips, but for Riker, I sanded these details off of the bust and fashioned up separate details to be placed later. Using premium acrylic model paints and a hair-fine brush, I meticulously base coated then layered colors. Dry brushing, washes and careful highlights brought out lifelike textures.
Painting the unique android features of Data along with Worf's intricate Klingon ridges was particularly challenging but enjoyable. For Data, I used a pearl-flaked clear to give his face a more synthetic android look. Geordi's visor was painted using Alklad II paints to mimic his visor’s metal effect. And since his visor is removable, I painted his eyes white with a hint of pupil, creating his disabled human eyes.


Basing
The final step was creating personalized display bases for each bust. I headed to my trusty program TinkerCad and designed something simple yet stylish. I designed and laser etched plaques with their character names and and ship and put it all together.
The Finished Collection
After weeks of work, the full TNG bust collection was complete and ready for display in my little Star Trek display corner of my home. I hope you enjoy how they turned out. Live long and prosper.


Comments